[Spring] Security 와 JWT 토큰 1
업데이트:
REST API 서비스
REST 아키텍처 스타일을 따르는 API는 API 서비스 개발을 위한 가장 일반적은 접근 방법으로 사실상 표준 자리잡았다.
REST API는 Java, Python, Go 등의 다양한 언어로 풍부한 레퍼런스가 존재해 구현이 쉽다는 장점이 있으며 HTTP 프로토콜 기반의 XML, JSON 등 어떤 기술로도 응용이 가능하다는 장점이 있다.
RESTful API의 장점
- 풍부한 레퍼런스
- 구현이 용이
- HTTP 프로토콜 기반의 어떤 기술이던지 응용이 용이
REST API를 구현할 때는 Stateful로 구현할지, Stateless로 구현할지 고려해보아야 한다. 이는 Session의 사용을 결정 짓기 때문이다.
따라서 먼저 둘의 장단점을 확인해본다.
Stateless 아키텍처
Stateless(무상태) 아키텍처는 Session을 전혀 사용하지 않는 상태로 수평확장이 매우 용이하다. 이는 세션을 사용하지 않음으로써 서버 장애를 고려 외부 스토리지를 사용해 세션을 저장하는 세션 클러스터를 이용하지 않아도 되기 때문이다.
하지만 무상태를 유지함으로써 단일 사용자의 로그인 컨트롤, 사용자의 유효성 체크, 강제 로그아웃 등의 기능 구현이 어려워 지는 단점을 가짐과 더불어 무상태 기반으로써는 유의미한 서비스를 개발하는 것이 어렵다는 단점이 존재한다.
Stateless의 장단점
- 장점
- 수평확장의 용이성
- 단점
- 다중 로그인 컨트롤, 사용자 유효성 체크, 강제 로그아웃 기능 구현의 난이로 유의미한 서비스 개발의 사실상 불가
Stateful 아키텍처
서비스 내에서 하나의 Session이라도 사용한다면 그 서비스는 Stateful하다고 볼 수 있다. 하지만 세션 클러스터가 필수불가결해지고 그에 따른 관리 포인트 증가로 수평확장이 어려워진다는 단점이 있다.
Statless와는 다르게 단일 사용자의 다중 로그인 컨트롤, 사용자 유효성 체크, 강제 로그아웃 기능 구현이 쉽다는 장점이 존재한다.
Stateful의 장단점
- 장점
- 유의미한 서비스를 개발을 좀 더 쉽게 만들기 위해서는 꼭 필요
- 단일 사용자의 다중 로그인 컨트롤, 사용자 유효성 체크, 강제 로그아웃 기능 구현의 용이성
- 단점
- 수평 확장이 어려움
- 세션 클러스터 이용으로 SPOF 가 생길 가능성 증가
이렇게 두 아키텍쳐는 서로 반대되는 장점과 단점을 지니고 있다. 그렇다면 두 아키텍처의 장점만을 사용할 수는 없을까 ?
구현과 확장이 용이한 Stateless와 보안 기능 구현의 용이성을 챙긴 Stateful 아키텍처의 장점을 사용하기 위해 JWT가 그 답이 될 수 있다.
JWT(Json Web Token)
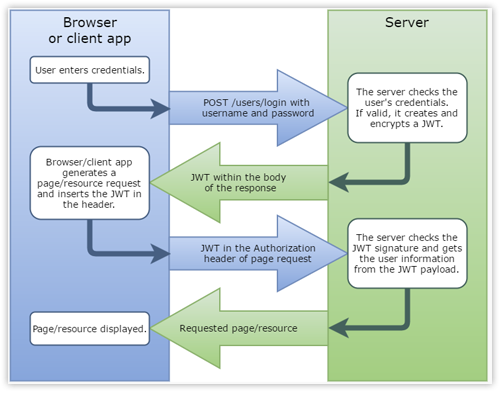
JWT는 Stateless 상태를 유지함과 동시에 서버에서 사용자를 식별할 수 있는 수단을 제공한다. 세션과 JWT의 처리 과정을 보면 매우 유사하지만 이 둘은 큰 차이를 보인다.

출처 : https://www.dnnsoftware.com/cms-features/jwt-authentication
먼저 JWT의 특징과 구조에 대해 알아본다.
JWT 특징
- JSON 포맷을 사용해 데이터를 만들이 위한 웹 표준이다.(RFC 7519)
- 토큰에 대한 메타정보, 사용자 정의 데이터, 토큰 유휴성 검증을 위한 데이터와 같이 자체적으로 필요한 모든 정보를 지니고 있다.
- URL-safe 텍스트로 구성되어 HTTP 프로토콜에서 위치에 상관없이 들어갈 수 있어 인터넷 상에서 쉽게 전달할 수 있다.
- 위변조 검증 기능을 가지고 있다.
- 서버에서 사용자가 성공적으로 인증되었을 때 JWT를 반환한다
- 클라이언트는 JWT를 로컬 영역제 저장하고 이후 서버에 요청을 보낼 때 JWT를 HTTP 헤더에 포함시킨다.
- 서버는 클라이언트가 전달한 JWT를 통해 사용자를 식별할 수 있다.
JWT의 구조
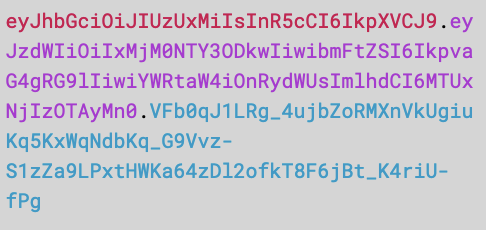
JWT는 Header, Payload, Signature와 같이 세 부분으로 나뉘어져 있다. 이 세부분은 모두 Base64 Url-Safe 방식으로 인코딩 되며 .를 통해 구분된다.
아래는 JWT 토큰의 예시이다. 이 예시는 앞으로 나올 구조들의 예시가 Base64로 인코딩 된 내용이다.

Header
헤더는 토큰 타입과 사용된 암호화 알고리즘과 같이 JWT를 검증하는데 필요한 정보를 담고 있다. 암호화 알고리즘은 HMAC, RSA방식을 지원한다.
아래는 헤더의 예시이다.

PayLoad
Payload에는 JWT를 통해 전달하고자 하는 데이터(Claim-Set이라고 한다)를 넣는다. 이때 JWT 자체는 암호화 되지 않기 때문에 민감정보를 포함해서는 안된다.
Payload는 Reserved Claims, Public Claims, Custom Claims 로 구분되며 Reserved Claims 사용이 권고된다.
아래는 Reserved Claims의 ClaimsSet과 다른 ClaimsSet에 대한 설명이다.
(Claims Set은 키-값 쌍이다)
- Resrved Claims
-
iss
토큰 발급자
-
exp
만료시간이 지난 토큰은 사용 불가
-
nbf
해당 시간 이전에는 토큰 사용불가
-
iat
토큰 발급 시각
-
jti
JWT ID, 토큰 식별자
-
-
Public Claims
사용자 마음대로 사용가능한 Claim
-
Custom Claims
사용자 정의 Claims(이름을 정의할 때 이미 존재하는 Public, Reserved와 같은 이름을 사용하지 않고 이미 존재하는 이름과 중복되지 않아야한다)
아래는 Payload의 예시이다.

Signature
Signature는 토큰 생성 주체만 알고있는 비밀키를 이용한 헤더에 정의된 알고리즘으로 서명된 값이며 이 서명을 통해 토큰이 위변조 되지 않았음을 증명한다.
아래는 Signature의 예시이다.

JWT의 장단점
JWT는 앞서 말했듯, Stateless의 장점과 Stateful의 장점을 누릴 수 있다. 하지만 단점 또한 존재한다.
-
장점
사용자 인증에 필요한 정보를 토큰에 담아 처리하기 때문에 외부 스토리지가 필요 없고 이에 따라 세션 클러스터가 필요없다. 또 이러한 장점은 수평확장이 용이하다는 장점과 Active User가 많은 서비스에서 유리하다는 장점을 불러온다.
-
단점
토큰 자체가 항상 Http 요청에 포함되기 때문에 토큰 크기를 가능한 작게 유지해야한다.
세션 제어, 만료처리 등 강제적인 제어에 대해 처리가 어렵다.
구현
기존 Session을 이용하던 프로젝트에서 Jwt를 사용하려면 다음과 같은 설정이 필요하다.
- 불필요한 의존성과 구현 제거
-
thymeleaf 템플릿 및 spring-session 관련 의존성 제거(spring-boot-starter-thymeleaf, thymeleaf-extras-springsecurity5, spring-session-jdbc
-
WebMvcConfigure 클래스 삭제
-
- Spring Security 설정 변경
csrf,headers,formLogin,http-basic,rememberMe,logout filter비활성처리- Session 관련 정책을 STATELESS로 변경
JWT 의존성 추가와 설정
Maven - pom.xml
<dependency>
  <groupId>com.auth0</groupId>
  <artifactId>java-jwt</artifactId>
  <version>3.18.1</version>
</dependency>
Gradle - gradle.build
implementation 'io.jsonwebtoken:jjwt-api:0.11.2'
implementation 'io.jsonwebtoken:jjwt-impl:0.11.2'
implementation 'io.jsonwebtoken:jjwt-jackson:0.11.2'
Property 설정
properties 파일에는 4가지 속성이 필요하다.
-
headerHttp Header 이름
-
issuer토큰 발급자
-
client-secret토큰 암호키. 암호화 알고리즘에 맞는 크기로 입력되어야 한다. (HS512의 경우 64바이트)
-
expiry-seconds토큰 만료 시간(초)
jwt:
  header: token
  issuer: yeoooo
  client-secret: EENY5W0eegTf1naQB2eDeyCLl5kRS2b8xa5c4qLdS0hmVjtbvo8tOyhPMcAmtPuQ
  expiry-seconds: 60
SecurityConfigure.class
Jwt를 활용하기 위해 Security의 설정에 Jwt 토큰과 이를 처리할 JwtAuthenticationFilter를 추가해줄 필요가 있다.
public class SecurityConfigure{

	...

	@Bean
	public Jwt jwt() {
	  return new Jwt(
	    jwtConfigure.getIssuer(),
	    jwtConfigure.getClientSecret(),
	    jwtConfigure.getExpirySeconds()
	  );
	}

	public JwtAuthenticationFilter jwtAuthenticationFilter() {
	  Jwt jwt = getApplicationContext().getBean(Jwt.class);
	  return new JwtAuthenticationFilter(jwtConfigure.getHeader(), jwt);
		}
	@Override
	protected void configure(HttpSecurity http) throws Exception {
	  http

		...

    .addFilterAfter(jwtAuthenticationFilter(), SecurityContextPersistenceFilter.class);
	}

	...

}
JwtConfigure.class
@Component
@ConfigurationProrperties(prefix = "jwt")
@Getter
@Setter
public class JwtConfigure{
	private String header;
	private String issuer;
	private String clientSecret;
	private int expirySeconds;

}
-
@ConfigurationProperties는 Property 파일 안의 속성과 name을 통해 값을 바인딩한다. 해당 어노테이션을 사용하기 위해서는
Getter와Setter가 각 필드에 존재해야한다.옵션은 다음과 같다.
-
prefix
prefix에 들어간 이름을 접두사로 가지고 있으면 바인딩한다.
-
value(default)
아무런 옵션명을 사용하지 않고 문자열을 넣으면 그 이름과 매칭되는 값을 바인딩한다.
-
ignoreUnknownFields = true(default)
바인딩되지 않은 남은 속성이 존재한다면 무시한다. false일 경우 오류를 발생시킨다.
-
ignoreInvalidFields = false(default)
유효하지 않은 프로퍼티가 존재하면 오류를 던진다. true일 경우 오류를 던지지 않는다.
-
Jwt.class
Jwt 클래스에서는 2개의 주요 메서드와 키-값 쌍을 제공하는 Claims를 제공해야한다.
- Jwt 발행을 맡는 sign 메서드
- Jwt 검증을 맡는 verify 메서드
@Getter
public final class Jwt {

  private final String issuer;

  private final String clientSecret;

  private final int expirySeconds;

  private final Algorithm algorithm;

  private final JWTVerifier jwtVerifier;

  public Jwt(String issuer, String clientSecret, int expirySeconds) {
    this.issuer = issuer;
    this.clientSecret = clientSecret;
    this.expirySeconds = expirySeconds;
    this.algorithm = Algorithm.HMAC512(clientSecret);
    this.jwtVerifier = com.auth0.jwt.JWT.require(algorithm)
      .withIssuer(issuer)
      .build();
  }

	public String sign(Claims claims) {
    Date now = new Date();
    JWTCreator.Builder builder = com.auth0.jwt.JWT.create();
    builder.withIssuer(issuer);
    builder.withIssuedAt(now);
    if (expirySeconds > 0) {
      builder.withExpiresAt(new Date(now.getTime() + expirySeconds * 1_000L));
    }
    builder.withClaim("username", claims.username);
    builder.withArrayClaim("roles", claims.roles);
    return builder.sign(algorithm);
  }

  public Claims verify(String token) throws JWTVerificationException {
    return new Claims(jwtVerifier.verify(token));
  }
	long iat() {
      return iat != null ? iat.getTime() : -1;
    }

    long exp() {
      return exp != null ? exp.getTime() : -1;
    }

	@NoArgsConstructor
	static public class Claims {
    String username;
    String[] roles;
    Date iat;
    Date exp;

    Claims(DecodedJWT decodedJWT) {
      Claim username = decodedJWT.getClaim("username");
      if (!username.isNull())
        this.username = username.asString();
      Claim roles = decodedJWT.getClaim("roles");
      if (!roles.isNull()) {
        this.roles = roles.asArray(String.class);
      }
      this.iat = decodedJWT.getIssuedAt();
      this.exp = decodedJWT.getExpiresAt();
    }

    public static Claims from(String username, String[] roles) {
      Claims claims = new Claims();
      claims.username = username;
      claims.roles = roles;
      return claims;
    }
	}
}
JwtFilter
마지막으로 Jwt를 활용할 Filter가 필요하다.
필터의 위치는 SecurityContextPersistenceFilter의 뒤가 적절하다. SecurityContextPersistenceFilter의 앞에 위치하게 되는 경우에는 SecurityContextPersistenceFilter가 SecurityContext를 덮어 써버리기 때문이다.
필터가 가져야하는 기능은 다음과 같다.
- 사용자에 대한 인증 여부 확인
- Http 헤더에서 Jwt토큰을 취득
- Jwt 토큰에 대한 검증과 디코딩
- UsernamePasswordAuthenticationToken 객체 참조를 전달
- loginId를 UsernamePasswordAuthenticationToken의 principal 필드에 입력
public class JwtAuthenticationFilter extends GenericFilterBean {

  private final Logger log = LoggerFactory.getLogger(getClass());

  private final String headerKey;

  private final Jwt jwt;

  public JwtAuthenticationFilter(String headerKey, Jwt jwt) {
    this.headerKey = headerKey;
    this.jwt = jwt;
  }

  @Override
  public void doFilter(ServletRequest req, ServletResponse res, FilterChain chain)
    throws IOException, ServletException {
    HttpServletRequest request = (HttpServletRequest) req;
    HttpServletResponse response = (HttpServletResponse) res;

    if (SecurityContextHolder.getContext().getAuthentication() == null) {
      String token = getToken(request);
      if (token != null) {
        try {
          Jwt.Claims claims = verify(token);
          log.debug("Jwt parse result: {}", claims);

          String username = claims.username;
          List<GrantedAuthority> authorities = getAuthorities(claims);

          if (isNotEmpty(username) && authorities.size() > 0) {
            JwtAuthenticationToken authentication =
              new JwtAuthenticationToken(new JwtAuthentication(token, username), null, authorities);
            authentication.setDetails(new WebAuthenticationDetailsSource().buildDetails(request));
            SecurityContextHolder.getContext().setAuthentication(authentication);
          }
        } catch (Exception e) {
          log.warn("Jwt processing failed: {}", e.getMessage());
        }
      }
    } else {
      log.debug("SecurityContextHolder not populated with security token, as it already contained: '{}'",
        SecurityContextHolder.getContext().getAuthentication());
    }

    chain.doFilter(request, response);
  }

  private String getToken(HttpServletRequest request) {
    String token = request.getHeader(headerKey);
    if (isNotEmpty(token)) {
      log.debug("Jwt authorization api detected: {}", token);
      try {
        return URLDecoder.decode(token, "UTF-8");
      } catch (UnsupportedEncodingException e) {
        log.error(e.getMessage(), e);
      }
    }
    return null;
  }

  private Jwt.Claims verify(String token) {
    return jwt.verify(token);
  }

  private List<GrantedAuthority> getAuthorities(Jwt.Claims claims) {
    String[] roles = claims.roles;
    return roles == null || roles.length == 0 ?
      emptyList() :
      Arrays.stream(roles).map(SimpleGrantedAuthority::new).collect(toList());
  }

}

댓글남기기